Advertise Here

Wednesday, March 30, 2011

Mixing It Up Some More!

Some years back, I used to work closely with this client who's obsessed with natural lighting. She would encourage (require) me not to bring any lights on assignments except for the camera and a reflector. And, to achieve that natural lighting look, our shoot skeds would only be during the golden hours.

Those days were fun, and frankly, I've learned quite a lot of natural lighting techniques....but at the same time, it was nerve wracking. You never know if the situation (lighting condition) will work. And as a freelancer, I am only as good as my last shoot. My next assignment would depend on how my last shoot turns out.

So to put my mind at peace, I've always managed to sneak in at least a single light in my gear bag....just in case.


For this assignment, I needed to shoot a portrait of the owner of a coffee shop. Bearing in mind that the look of the shot has to be naturally lit, I placed our coffee lover beside a window. This will be my key light. The first challenge I faced was that the light coming in was too harsh...quick fix? I simply pulled down the blinds to diffuse that harsh sunlight and the white table worked in my favor too since it provided fill.

As far as lighting our subject was concerned, I was good to go! But you already know that that is just half the story.

Because of the strong light coming in through the window (even with the blinds down), my exposure setting for our subject caused too much contrast that the background was 2 or 2 1/2 stops underexposed.

The obvious solution that I went with was to light it with strobe, still bearing in mind though that I had to somehow make it appear naturally lit.

To achieve this, I lit the background bare bulb, and pointed my strobe towards the ceiling. I placed the light behind our subject, camera right just outside the frame and set the power of my strobe to match the intensity of my (natural) key light. Because I was spreading light by bouncing if off the walls and ceiling, I was able to soften up the light. Also, it caught the color of the wall which gave a warm colot temp as a result. I repositioned the light some more so it will evenly light the background and let some light spill onto my subject's left shoulder and face.

Though my client figured that I mixed natural and artificial light for this, she gave this a nod and made its way to print.

Hope this helps. Happy shooting!

Friday, March 18, 2011

29 Hours in Davao

Finally I was able to get myself to do that long over due hard drive inventory the other day. It's a good habit I'm forcing myself into (with great difficulty!) just so I can properly archive my files.

I chanced upon these photos which I took over a year ago when I was sent to Davao, Mindanao. I was in that city for less than a day and a half to take a portrait of a business man which my client was doing a story on.


After the day's assignment, I decided to heed our hotel front desk officer's advice to check out their city park. I sensed the pride they have for this park so I went for a night stroll there.

And they were right! It's such a beautiful park! Lots of trees, clean, fresh air, no street urchins, clean, proper security measures at the gate, good balance of pavement and ground, clean, lots of benches...did I mention that it's clean?

For these photos, I just used the usual night photography technique. Set my ISO at 400, rested my cam on a bench to steady it, dragged the shutter to let low light in and chose f8 to get good depth of field.

Next time your in Davao, visit the city park and see why the Davaoenos take so much pride in this park. Oh and....don't forget your camera.

Happy shooting!

Wednesday, March 9, 2011

Old School Revisited

Back in the days when photographers didn't have the aid (luxury) of LCD's, we were (for lack of better term) forced to study our frame and plan for our exposure carefully before tripping the shutter. Those rolls of transparencies didn't come cheap.

So as homage to the fore bearers of this craft which I have grown to love so much, Please allow me to share with you a basic and simple technique which I learned from them on how to isolate light on your subject and add drama to the image, without the aid of your lcd.


In the photo above, much of the frame is covered in black and isolated lights gave only hints of the man's profile. It's actually so cliche to shoot a blind man like this, but hey, you gotta love cliches sometimes!

To expose for this, I first turned our subject so that he will be facing towards the light, then metered for the man's face with my camera pointing at him face to face (well, face to camera to be more exact). I filled my frame with just his face so that the reading I will get will be just from the light falling on his face. This gave me a reading which yielded a setting that underexposed his surrounding background.


The photo shown is with the exposure setting with him turned towards the camera. Notice that the background is underexposed since I metered for the light on his face only. I locked on to that setting then reframed my shot showing the right side of his face. As a result, I am now capturing the shadows on his face. I pulled back some more to fill my frame with more shadows and reveal the black background. The result is an image filled with dark shades and just hints of light to direct you to this blind man's profile.  Here's the final image again.


Next time when you're in a shoot and find yourself with a bit more time, try resisting the temptation to look at your lcd to check and correct your shots and give this simple technique a try. It's worth learning it.

Hope this helps, happy shooting!

Tuesday, March 8, 2011

Food Shoot On the Fly

One of the challenges of shooting in several locations all in one day is keeping yourself mobile. By doing so, it is inevitable that you leave some (or most) of your equipment at home and just bring the bare necessities.

Over the years, I've learned that my bare necessities are my camera and tripod. If situation calls for letting me choose between my tripod or my lights, I'd pick my tripod easily. It's more practical.

In one such occasion, I only had my camera and tripod since the assignment would require me to go to several places to shoot. With this assignment I had to shoot the interiors of a restaurant and of course, the house specialty cake.

Normally (under favorable conditions), I would shoot food with a minimum of two lights, one light as key and the other as fill. But for this shoot, I didn't have time nor the space to set up lights (well, I didn't actually bring any). Quick fix? Use my tripod and available light!


To set up for this shot, I chose a window where the light coming in was diffused. I didn't want direct sunlight since this would wash everything out. This window was perfect and it would serve as my main light. I placed the cake in such a way that the light hitting it will be coming from the 1 to 3 o'clock position of my frame. This is a good way to light for a food shot since backlighting brings about more texture to your subject and it gives you your rim light. And since the window is big enough, it covered most part of the frame. To set my exposure, I metered for the jam on the cake (in shooting cakes like this, it's a good idea to meter for the darkest part). But since there was too much contrast in tones, metering for the darkest part over exposed everything else. To correct this, I underexposed the jam for 1 stop and this gave an acceptable exposure for the rest of the frame. To compensate for the underexposure, I threw in some fill light using a white plate which I borrowed from the waiter. This fill brought back the normal tone and color of the jam and it also provided fill for the shadows of the cake.

There you go, a very simple and practical way for a food shoot on the fly.

Hope this helps, happy shooting!

Sunday, March 6, 2011

Mixing Light for Portraits

In my last post, I talked about how to mix ambient with strobe light when shooting interiors. This simple technique is used by a lot of photographers in lighting for a lot of subjects...and yes, this could also be used when shooting portraits.

When I was still learning how to use strobes for my portrait shoots, I used to have the notion that I should always use them to light the subject. Well, actually, in most cases, this is true. But how about if I only have one strobe light (I only had one when I started..I guess most of us do) and needed to light the background as well? Solution? Either use the strobe light for lighting the subject and let the ambient light for the background or vise versa.

In this photo, I chose to light my subject with natural (ambient) light and used my strobe to light for the background.


Our team wanted a shot of our subject by the entrance of her house. The challenge is, the frame covering our shot wasn't evenly lit, and I came to the shoot with only one strobe(out of laziness basically). Luckily, I had enough ambient light to work with.

The solution(and set up) was actually very simple. Here's how I did it.

Since I only had one strobe to work with, I placed our subject in a spot where I can fully utilize the ambient light. In this case, we placed her at the left side of the door. This is a sweet spot for the ambient light and she would not be covering that path leading to her living room. The light falling in this area is about half a stop over the light falling onto the living room behind the brick wall. That was fine since I wanted a bit of separation for my subject and the background. I metered for this and set my exposure for this lighting. By doing so, I got the exposure I wanted for my subject and the living room. But the small hallway between her and that brickwall was 3 stops underexposed because there was very little ambient light falling unto it. So I put my sole strobe behind her at camera left (just outside the frame), set the power to match the ambient light and bounced it off to the ceiling.

And that's it! One very simple set up using just one strobe.

Hope this helps. Happy shooting!
 

Wednesday, March 2, 2011

Shooting Interiors

Shooting interiors can be a lot of fun, at the same time, it can be a bit of a challenge. One of the most common obstacles that a photographer encounters when shooting interiors is how to handle the lighting. In most cases, an interior would already have an ambient lighting which matches the theme of the room, and, more often than not, this ambient lighting would suffice to make a good image.

From here, a photographer can decide then whether to shoot the interior with its ambient lighting only or to mix it with flash or strobe light. Me however, I choose the latter (most of the time), and for a good reason. By mixing ambient and strobe light, I can fill in areas of shadows and/or add highlights unto the image. Here's how I do it.

First, I strongly suggest that you use a tripod when shooting interiors. This will greatly help you steady the camera since you would be using long exposures if you are going to capture that ambient light.

When mixing ambient and strobe lighting, remember that your shutter speed controls the ambient light and the aperture controls your strobe/flash lighting.

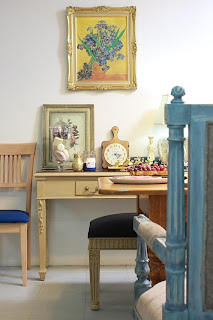
In this photo, I added strobe lighting coming from the right and hitting the right side of the wall and the table top. Being careful not to drown out the ambient light of the room and the lamp.


To do this, I first set my f-stop at 5.6 since I wanted to blur the foreground just a bit. I metered for the ambient light to get the right combination of aperture and shutter speed for the correct exposure. Once I got that, I placed my strobe at camera right in line with the table and bounced it off to a wall on the right. By bouncing my light off to a wall, I was able to soften up the light falling onto the table. I then adjusted my ambient light settings to yield for a half-a-stop underexposure (to allow for that highlight from my strobe). Set the power of my strobe half-a-stop over the original ambient light reading to create that slight highlight on the wall and table top.

In another example of mixing ambient and strobe lighting, for this photo I metered for the ambient light first and simply filled in the shadow areas by bouncing my strobe onto a wall behind the camera.


Hope this helps. Happy shooting!