Advertise Here

Monday, July 1, 2019

Make Real Money With These Smartphone Photography Apps

image by junpinzon

Since the advent of digital photography, more people are getting into the craft. Some have taken it as a serious hobby while some crossed over and turned it into a full time job. Although getting projects might be a bit challenging at first, there are some ways where both hobbyists and professionals alike can earn some extra cash doing what they love.

In this article, I will be sharing with you some smartphone apps that I use to earn a little bit of extra cash. They are all proven money makers and acts as supplemental income for my full time photography career. I am yet to get to the point where I can live off the earnings from these apps…. I’ll let you now immediately if and when I get there. For the meantime, let’s just enjoy the journey, they are all fun to do and they continue to earn money for me.

1. Eyeem (IOS and Android)
Let me start with this one. Among the smartphone/photography apps that I use, this one has earned me the most, to date, I’m close to making four digits from it since I joined two years ago. Eyeem is a social media network/photo community where photographers share their photos. The skills level of photographers there vary from newbies to seasoned ones. It’s like Instagram but you have the option to sell your photos at their marketplace. They are sold as stock photos and are marketed through the network of stock photo giant, Getty Images. There are two ways to make money at Eyeem, The first is to submit and sell it on their marketplace and secondly, join Missions. Company/Brands put up an image brief to explain what type of images they need and members of the community can submit to those missions for a chance to be selected and bought. Aside from being able to sell your photos there, you can also improve your photography skills by learning through the tips and inspiring stories that are shared by other photographers.

You can cash out every time an image of yours get sold, there’s no threshold. Request to cash out via your Paypal account and wait a few days for Eyeem to process the payment and you’ll receive it in your Paypal account.
You can create your free account HERE. or via the app.

2. Foap (IOS and Android)
This is the first money-making-app-from-photos I discovered when I had my first smartphone. I was reluctant at first because I’m used to having my images licensed through traditional stock photo agencies. I uploaded a couple of dozen photos at first to see what would happen. Almost immediately I got “likes” from the community and after about more than a week of constant interaction with fellow photographers there, I got my first sale from the first batch of images. They sell your photos in the market place for $10 and you split this money with Foap. In addition to this, you can earn more if a brand buys your image in the Missions area. They put up an offer and give an image brief, you then submit according to the brief and if the brand likes the image, they buy it. And just like Eyeem, your images are sold in the network of Getty Images. I’ve earned more than a couple hundred dollars from Foap since I joined in late 2015.

To me, Foap is a concrete proof that you really don’t know what kind of image will sell in the stock photo industry. I’ve been a stock photographer for quite sometime now and I am guilty of over thinking the production of my images. Ever since I joined Foap I loosened up and produced more authentic and natural looking images. They love that kind there. Take a look at the sold images page and you’ll see that they are authentic and mostly spontaneous. It’s very seldom that you’ll find a commercial-type-of-lighting-overly-posed-image sold there. I must say that some are less than professional looking images but it seems that this is the trend now, photo buyers are going for that authentic look. You can only create your account for free as a photo seller by downloading the app, they have it both in IOS and Android.

You can cash out anytime because there’s no threshold. There is a longer waiting period though before you can get paid, it’s a month after you’ve requested payment. They pay thru Paypal so make sure you have a verified Paypal account.

3. Twenty20 (IOS only)
I am always looking for new platforms to sell my stock photos and I scour the internet to find them. Fortunately, I found Twenty20 and immediately signed up and created my free account. They were in the early stages when I chanced upon them, I didn’t give it much thought and had no expectations, but as it turns out, it’s one of my very consistent (side)income earner. Just like the first two which I listed above, you can earn two ways with this app, either through the marketplace or by joining missions. I joined them three years ago and am happy with what I’ve earned from them to date. When they first started out, you can make $2 for each photo sold but since Envato acquired the company, there were some changes in the commission scheme, you can learn about it HERE. With its addition to the Envato family, it is expected that more clients and potential buyers will discover contents up for sale there. Envato is a well established company and things can only go better for Twenty20. Unfortunately there’s no Android version of the app, however, Android users can still register and upload via the website. Learn how to do it HERE.

There’s no threshold and payment is made monthly via Paypal.

I’ve listed these three apps because I already have an actual earning experience from them. There are other apps out there that offer the same type of business concept but I haven’t had any breakthroughs yet so I’m keeping the testimony until I have one. I will update this article when I’ve had success with them already.

Aside from these, there are the conventional stock photo agencies through which you can also sell photos and where I also sell mine. Though they have an app available, I didn’t include them in the list because the process works best in their website. I'll write another article about that so I can share with you my experience and hopefully help you succeed in selling your stock photos.

As for now, I wish you lots of luck in trying out these apps.
Thursday, July 28, 2016

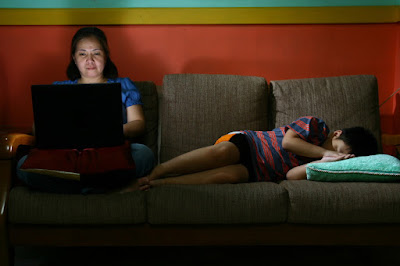
Work At Home Mom and Kid (How I lit the shot)


This image is steadily gaining grounds among my stock photos. It has been sold quite a number of times already. You can see the image here.

Thought I'd share with you how I lit it.

This is a three light set up, one for the mom, the other for the kid lying on the couch and another to fill in the shadows.

The first speedlight is domed, bounced off a white paper taped onto the screen of the laptop. The next speedlight is as camera left, zoomed to 200mm and aimed at the kid. The third speedlight is behind the camera and bounced off the ceiling. This third speedlight fill in the deep shadows produced by the hard lights.

Camera settings were ISO 200, f5.6, 1/200th.

Hope this helps. Happy shooting!

Monday, June 29, 2015

Signing A Contract


So what does a struggling microstock photographer who's always on a shoestring (to almost nothing) budget do when he needs a model for a shoot?  Use himself as the model!

Well, just the hands and torso actually.

Lighting was easy but the framing took some time to perfect.  Simply because I didn't want to include my face in the shot.

The camera was obviously on a tripod.  I prefocused and triggered it via the cam's timer.

Three speedlights on this one.  One with grid, one with umbrella and the other with a dome.

Key light was on a boom stand directly above and aimed at my hands and the contract that I was signing.  It was gridded so I can contain the beam and have that spotlight effect directing your  attention at the hands and contract.  A domed speedlight was clipped under the table's edge just to bring bask some details onto my torso and act as separation light between the hands and torso.  The final speedlight with umbrella was aimed at a frosted glass behind me creating that halo shaped light at my back.

I'm proud to say that this image is available online at Shutterstock, Fotolia, Dreamstime, Depostiphotos, 123rf, Bigstock and Istock.

Hope this helps.  Happy shooting.

Wednesday, June 24, 2015

Lighting a Glass Chess Set


This is one of my favorite images.  I like how the lights interacted with the subject matter and with each other.

This is a glass chess set which I found lying around the house. I've always wanted to shoot a chess set to illustrate the concepts of planning, game and strategy. I think the image concept can be applied to a lot of image requirements such as business and sports.

Lighting was fairly simple, here's how I did it.

There were three speedlights for this shot. Two of them gelled red and blue accordingly. All of the speedlights had grids on them so I was able to contain the beams on selected areas .  The red gelled speedlight was at camera right and aimed at the pawn and knight. The blue gelled speedlight was at camera left and aimed at the rook and bishop. The final non-gelled speedlight was at camera left and aimed at the King which I tilted with my finger just to animate the shot a bit. This was shot with the camera on a tripod and I used a 70-300mm lens to produce bokeh. Camera settings were iso200, 1/200 and f6.3. The speedlights were at a low power output since they were pretty close to the subject. Can't remember the exact numbers because I just chimped it.

You can find the image live online at Shutterstock, Fotolia, Dreamstime, Bigstock, 123rf, Depositphotos and Istock.

Hope this helps. Happy shooting.

Saturday, June 20, 2015

Kid with Laptop, smartphone and tablet (How I lit this one)


I just had a notification from Shutterstock that as of June 17, 2015, this image have downloaded 50 times!  It has been online with them since November 2014. I'm not really sure what a good number of downloads in a given period of time is, but I'm pretty psyched about the performance of this image. It's actually part of a series but this one stood out among the rest.

Thought I'd share with you how I lit this one.

I used four speedlights for this one. 3 of them gelled with red, blue and green accordingly. Key light was placed on the laptop, domed and bounced against a typewriting paper taped onto the screen. Another speedlight at camera right, which was placed at the far end of the room, was gelled blue and bounced on the ceiling. This gave the overall blue cast in the room. A third speedlight gelled green, still at camera right, was aimed at our our tech savvy kid. Then the final speedlight gelled red was placed on the floor, behind the bed and aimed at the wall.

I can't recall the actual power settings of the speedlight as they seasoned to taste. As for the camera settings, ISO 200, 1/200 and f 5.6

Aside from Shutterstock, this image is also live online(and proud to  report that is also doing well) at Dreamstime, Depositphotos,  Bigstock and 123rf. Please check it out.

Hope this helps. Happy shooting.

Tuesday, June 16, 2015

Glass of Water (How I lit it this time)

I've shot glasses of water a lot of times already and I've always looked for ways to find a new twist to it.  And I must admit that I've failed more times than I've succeeded. But despite this I still like shooting this subject matter, so here's my latest shoot with a glass of water.

There's really nothing new about it, a plain clear glass with water in it and another variation with water being poured in it.


What's new this time was how I lit the subject and the background.

It's just one source of light and a white reflector board. A speedlight was placed camera right, behind a cabinet door. The door have this slanted wooden planks with spaces in between each plank.

I placed the subject near the background wall so the sole speedlight can illuminate both the subject and the background.  I think those streaks of light produced by the planks are cool and that's the new "twist" I have for this yet another glass of water shoot.

Speedlight was set at 1/4 power output, camera settings was ISO 200, 1/200, f 5.6 and tungsten white balance.

Fortunately, this image is now live online at ShutterstockDreamstimeFotolia, 123rf, 
Bigstock, Depositphotos and Istock.  Please check it out.

Hope this helps. Happy shooting.

Saturday, June 13, 2015

Alcholic Drinks


This is one of my favorite images.  It has been sold quite a number of times already.
Thought I'd share with you how I did this shot.

I filled these goblets with water and added some food coloring.  Red for red wine and 
soy sauce for brandy and scotch.

I put them atop a white marble table which in turn gave that cool shiny reflective 
surface effect.

As for the light, two speedlights inside a diy softbox (I'll blog about this in the future) 
placed directly behind the goblets.

I was basically shooting against the light for this one.

Both speedlights were set 1/4.  Camera settings was at Iso 200, 1/200, f5.6.

I'm very fortunate that this image is online at several microstock sites.  

and Istock.

Hope this helps.  Happy shooting!