Advertise Here

Tuesday, December 27, 2011

Point and Shoot Fun

While some (or most) photographers would prefer to lug their DSLR's around all the time, others would rather have a compact cam always tucked into their pockets for some quick snaps where ever they go. These days, technology has already caught up with the demands of photographers and have developed compact cams with full manual control features. But this comes with a price. For the budget conscious, they would rather buy compact-point-and-shoot-cams.


But this should not mean that you will put fun aside. Decent, budget friendly point-and-shoots can still yield good photos. You just need to familiarize yourself with the cam and apply the basic photography-principles.

For example.....slow shutter shooting. This technique can easily be achieved in your DSLR by putting your cam on Manual mode and by turning your shutter dial to a desired slow shutter speed.

It's a bit different on your point-and-shoot though.

There are two ways to do this:

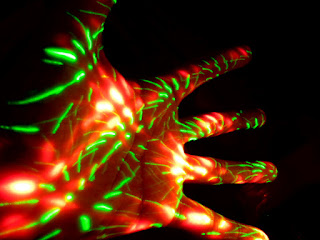
One...if your P&S has an ISO setting adjustment, set it at the lowest ISO setting, and turn the flash off. With this setting, even if the cam is on P (program mode), it will still give you the slowest shutter speed within the limits and capacity of your P&S. My P&S yielded an F3.5 aperture and an average of 1sec or 1/4 sec shutter speed.

Another way is to set your cam on Night Shot mode. This setting automatically sets the camera at a slow shutter speed alowing low light to be captured.

With these settings, you can either steady your cam with a tripod or create motion blurs like I did here.

Always have fun and never let equipment limitations get in the way.

Hope this helps. Happy shooting!

Friday, December 9, 2011

Bar Scene

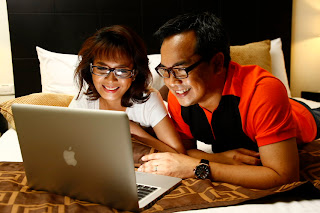
One of my recent campaign shoots required me to shoot in a bar where there were supposedly people having drinks by the bar and watching an exciting ball game.


Sure thing, but because the bar isn't fully operational yet, there's no TV. So we just had to imply it.

We had our models sit by the bar and asked all of them to look in one direction. In this case, our key light source. This will be our "TV". I have a similar post about this, please check out "There's Not Enough Light".

I had my strobe placed high enough so as to mimick a TV set in a bar. I used my smallest white umbrella to limit light to our couple and put it in shoot through position. I then set my strobe at the lowest power output.

As for lighting the rest of the frame, I needed to have that "bar" feel so I matched the orange light coming from the pin light as seen at upper right of the frame. I placed a strobe at the back of our subject (outside of frame, camera left) then gelled it with CTO.

Lighting? Check.

All that's left was to stage the shot.

"Models....at the count of three....and....one...two.....three!

Hope this helps. Happy shooting!

Wednesday, December 7, 2011

Simple Color Scheme


When my writer and I walked into the stadium where we will interview and shoot Smart Gilas Coach Toroman, I knew right away where and how to shoot him.

The red seats on the bleacher would make an excellent element for the portrait. His wearing a blue jersey put the icing on the cake.

I got the idea for the color scheme from the small Philippine flag printed on his jersey and figured I could/should use that for his portrait.

To stick with the color scheme I had in mind, I drowned out all ambient light by setting my shutter speed at the highest sync speed. Placed two strobes to cross light our subject and gridded them both. Both strobes were set at 1/4 power output since I wanted to open up my aperture for a shallow depth-of-field.

Hope this helps. Happy shooting!
Tuesday, December 6, 2011

"Real" People


Most of my clients nowadays are intermittently getting real people (non-pro-models that is) for some of their campaign shoots. I've been doing this for quite some time now and I must say that it's both challenging and fun to work with people who doesn't model professionally.

As was the case for a campaign which I shot recently.

Despite having no professional modelling background, our real people/models for that day nailed the shot we wanted. It took some prodding but once they got comfortable in front of the camera, it was easy sailing from that point on.

Below is a photo of how I lit for this shot. Nothing fancy. Just needed that well-lit look.


Working with non-professional-models can be fun. But this will depend on the mood that you will set. Just don't be stiff and strict with them and you'll find out that they won't give you a hard time.

Hope this helps. Happy shooting!

Friday, December 2, 2011

There's Not Enough Light!

Just in case you don't know yet....I would like to share with you this very old trick.


If in the future you'll get an assignment to shoot someone who's supposedly looking onto a computer monitor or a TV and wants the effect that the monitor is illuminating their face, forget about trying to capture that available light from the monitor to light your subject's face.

It is just too weak.

Instead, put a speedlight there, zoom it out to its widest angle and set it at its lowest power and you'll be able to get the effect that you want as in the case of this photo.

All that remains is aligning everything together to get your desired effect.

Hope this helps. Happy shooting!

Beauty In A Box

It is often suggested that beauty shoots should be lit with big, soft lights. But what if you can't fit those big light modifiers in the room?


As was the case for this project.

With space constraint, I decided that I can use that small space to my advantage. Instead of brining in big light modifiers, I turned that small space into some sort of a giant light tent.

We covered the walls on each side and at the back of our subject with white styrofoam and bounced light off them....voila! Instant light tent!

I chimped for the lighting ratio and adjusted to taste. The final foam was placed in front of our subject, below and just outside of frame to reflect back light onto our subject's face.

Hope this helps. Happy shooting!

A Quickie Shoot with a Household Name


Once again, my apologies for being quiet for a while. I've been spending my downtime sleeping 'cause it's been really busy the past months.


Anyway, if you're from the Philippines, I'm sure you're familiar with the brand name Mama Sita. Am truly thankful that I got the rare chance to photograph the son of the woman who started this business which eventually became a household name among almost every filipino kitchen.

A busy person that he is, I knew that I had to keep the shoot as quick as possible. Having this in mind, I decided to shoot with just a single light source to minimize set up time. I shot him in several spots of their office compound but this one is my favorite (this one didn't make it to print though since my art director chose a tighter layout).

As mentioned, this was lit with a single strobe positioned at high camera right. I didn't use any light modifier for this one except for a sock on its standard reflector. I wanted a small light source to contain light just enough. The available light was underexposed 1 1/2 stop to give emphasis on the spot where I lit for our subject.

Hope this helps. Happy shooting!