Advertise Here

Tuesday, December 27, 2011

Point and Shoot Fun

While some (or most) photographers would prefer to lug their DSLR's around all the time, others would rather have a compact cam always tucked into their pockets for some quick snaps where ever they go. These days, technology has already caught up with the demands of photographers and have developed compact cams with full manual control features. But this comes with a price. For the budget conscious, they would rather buy compact-point-and-shoot-cams.


But this should not mean that you will put fun aside. Decent, budget friendly point-and-shoots can still yield good photos. You just need to familiarize yourself with the cam and apply the basic photography-principles.

For example.....slow shutter shooting. This technique can easily be achieved in your DSLR by putting your cam on Manual mode and by turning your shutter dial to a desired slow shutter speed.

It's a bit different on your point-and-shoot though.

There are two ways to do this:

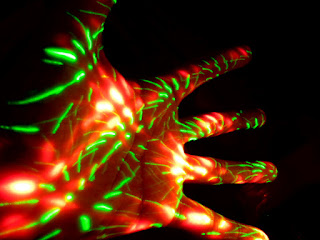
One...if your P&S has an ISO setting adjustment, set it at the lowest ISO setting, and turn the flash off. With this setting, even if the cam is on P (program mode), it will still give you the slowest shutter speed within the limits and capacity of your P&S. My P&S yielded an F3.5 aperture and an average of 1sec or 1/4 sec shutter speed.

Another way is to set your cam on Night Shot mode. This setting automatically sets the camera at a slow shutter speed alowing low light to be captured.

With these settings, you can either steady your cam with a tripod or create motion blurs like I did here.

Always have fun and never let equipment limitations get in the way.

Hope this helps. Happy shooting!

Friday, December 9, 2011

Bar Scene

One of my recent campaign shoots required me to shoot in a bar where there were supposedly people having drinks by the bar and watching an exciting ball game.


Sure thing, but because the bar isn't fully operational yet, there's no TV. So we just had to imply it.

We had our models sit by the bar and asked all of them to look in one direction. In this case, our key light source. This will be our "TV". I have a similar post about this, please check out "There's Not Enough Light".

I had my strobe placed high enough so as to mimick a TV set in a bar. I used my smallest white umbrella to limit light to our couple and put it in shoot through position. I then set my strobe at the lowest power output.

As for lighting the rest of the frame, I needed to have that "bar" feel so I matched the orange light coming from the pin light as seen at upper right of the frame. I placed a strobe at the back of our subject (outside of frame, camera left) then gelled it with CTO.

Lighting? Check.

All that's left was to stage the shot.

"Models....at the count of three....and....one...two.....three!

Hope this helps. Happy shooting!

Wednesday, December 7, 2011

Simple Color Scheme


When my writer and I walked into the stadium where we will interview and shoot Smart Gilas Coach Toroman, I knew right away where and how to shoot him.

The red seats on the bleacher would make an excellent element for the portrait. His wearing a blue jersey put the icing on the cake.

I got the idea for the color scheme from the small Philippine flag printed on his jersey and figured I could/should use that for his portrait.

To stick with the color scheme I had in mind, I drowned out all ambient light by setting my shutter speed at the highest sync speed. Placed two strobes to cross light our subject and gridded them both. Both strobes were set at 1/4 power output since I wanted to open up my aperture for a shallow depth-of-field.

Hope this helps. Happy shooting!
Tuesday, December 6, 2011

"Real" People


Most of my clients nowadays are intermittently getting real people (non-pro-models that is) for some of their campaign shoots. I've been doing this for quite some time now and I must say that it's both challenging and fun to work with people who doesn't model professionally.

As was the case for a campaign which I shot recently.

Despite having no professional modelling background, our real people/models for that day nailed the shot we wanted. It took some prodding but once they got comfortable in front of the camera, it was easy sailing from that point on.

Below is a photo of how I lit for this shot. Nothing fancy. Just needed that well-lit look.


Working with non-professional-models can be fun. But this will depend on the mood that you will set. Just don't be stiff and strict with them and you'll find out that they won't give you a hard time.

Hope this helps. Happy shooting!

Friday, December 2, 2011

There's Not Enough Light!

Just in case you don't know yet....I would like to share with you this very old trick.


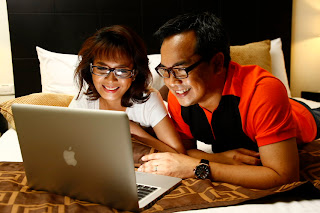
If in the future you'll get an assignment to shoot someone who's supposedly looking onto a computer monitor or a TV and wants the effect that the monitor is illuminating their face, forget about trying to capture that available light from the monitor to light your subject's face.

It is just too weak.

Instead, put a speedlight there, zoom it out to its widest angle and set it at its lowest power and you'll be able to get the effect that you want as in the case of this photo.

All that remains is aligning everything together to get your desired effect.

Hope this helps. Happy shooting!

Beauty In A Box

It is often suggested that beauty shoots should be lit with big, soft lights. But what if you can't fit those big light modifiers in the room?


As was the case for this project.

With space constraint, I decided that I can use that small space to my advantage. Instead of brining in big light modifiers, I turned that small space into some sort of a giant light tent.

We covered the walls on each side and at the back of our subject with white styrofoam and bounced light off them....voila! Instant light tent!

I chimped for the lighting ratio and adjusted to taste. The final foam was placed in front of our subject, below and just outside of frame to reflect back light onto our subject's face.

Hope this helps. Happy shooting!

A Quickie Shoot with a Household Name


Once again, my apologies for being quiet for a while. I've been spending my downtime sleeping 'cause it's been really busy the past months.


Anyway, if you're from the Philippines, I'm sure you're familiar with the brand name Mama Sita. Am truly thankful that I got the rare chance to photograph the son of the woman who started this business which eventually became a household name among almost every filipino kitchen.

A busy person that he is, I knew that I had to keep the shoot as quick as possible. Having this in mind, I decided to shoot with just a single light source to minimize set up time. I shot him in several spots of their office compound but this one is my favorite (this one didn't make it to print though since my art director chose a tighter layout).

As mentioned, this was lit with a single strobe positioned at high camera right. I didn't use any light modifier for this one except for a sock on its standard reflector. I wanted a small light source to contain light just enough. The available light was underexposed 1 1/2 stop to give emphasis on the spot where I lit for our subject.

Hope this helps. Happy shooting!

Friday, September 16, 2011

Be Quick But Not Hasty

Like most photographers, I dabbled into street photography. I used to do a lot of this when I was just starting out and this was how I practiced my composition. So after accomplishing my task to shoot a stall owner in a wet market, I sneaked in some time to re-live those fun days.

Here are some of the shots.


Next time you're shooting in the streets, remember to take time to think about your frame before you trip the shutter. Consider elements, lighting condition and wait for the right moment. Be quick but not hasty. This will make the difference between a good, story-telling-photo and a common snap shot.

Hope this helps, happy shooting!

Monday, September 12, 2011

Less...Or None is More


This image has always been one of my favorites, so simple yet so full of character.

Another reason why I like this shot is because of the simplicity of how this was shot. It's actually an out take from a resto shoot and was one of those oh-i'll-take-this-shot-anyway kind of shot. The shoot was already done when I spotted these charming little cupcakes in the showcase. The way the colors played was what caught my attention. I knew that my editors didn't need a dessert shot so I took this one for my own consumption only.

The thing is, I didn't set up any lights here but instead just used the flourescent light above the shelf inside the showcase which created those very nice highlights. I switched to flourescent on my cam's white balance, steadied it on a tripod and shot this from the back of the showcase to avoid glass reflection. I wanted very minimal depth of field and concentrate focus on the cherry so I opened up to f2.8. The first test shot was good but I still wanted more selective focusing. I popped on a close-up attachement on my lens and the result was this shot.

In my opinion, what's good to remember here is that one should always be quick to recognize a good lighting situation. This, of course, takes a lot of practice and discipline and it's something that I am also teaching myself to always do. Just because we know how to light doesn't necessarily mean that we would light everything every time. If it works perfectly, don't fix it. Improve, but don't complicate.

Hope this helps, happy shooting!

Wednesday, August 24, 2011

Fake Sun


Though not a big fan of the show, I felt some sense of pride when I was assigned to shoot Biggest Loser Asia finalist Chef Carlo Miguel. I didn't realize what the fuzz was about until I saw his before photos, and men!...it was really quiet a feat he achieved there!

My client ran a story on weight loss and Chef Carlo was on top of the list as a subject.

We did several layouts for the shoot and almost all of them showed how much weight he lost. I wanted to do something not-so-stating-the-obvious so I decided to have one layout with him just sitting down (this shot is an outtake and didn't make print....it lacked that weight-loss-feel thingy).

I was looking for mood and texture for this one shot with him and saw this part of the restaurant. I loved the textured light at the end of the room and decided that that will be my backdrop. I also liked the sunlight coming in from the door at camera left and planned to use this as my main light. Mood and texture?... check and check.

I framed the shot, metered for the ambient light and did a test shot. For my desired exposure, I needed to set my cam at ISO400, my shutter speed at 1/60 and aperture at f3.5.

Good to go? I thought so, until I did a test shot with a stand-in. The sun wasn't lighting my subject well enough. I didn't want to change any of my cam setting anymore since I already liked what I saw. I didn't want to flood the shot with artificial light either since this was not the mood I was gunning for.

Solution? I placed a single strobe at camera left, beside the door where sunlight was coming in, mimicking the sunlight. Set it at the lowest power setting and bounced it off an umbrella. The result put the shot where I want it to be but still felt that my "fake sun" still looked fake. It was still too harsh and I was already at the lowest power setting of my strobe. Again, I didn't want to change any of my cam setting so I need to do something about my "fake sun". So I placed a white transluscent cloth on my umbrella, ala Softlighter, to achieve the desired lighting.

The result was this shot. Doesn't look fake eh?

Hope this helps. Happy shooting!
Tuesday, August 23, 2011

Brief Moment With a Legend

Apologies for the long quiet time, it's been quite crazy these past few months. Anyways....


Above everthing else, what I'm really thankful about my profession is that I am able to meet a lot of interesting people. And every now and then, you get the unique opportunity to shoot a legend.

You don't say no to an assignment like that!

Lucky for me I had time and managed to include the rare opportunity to shoot boxing legend, Gerry Penalosa, that day.

Though this shoot/interview sked granted by Gerry was exclusive to us, we didn't want to abuse it and take much of his time. We maximized the sked alloted for us and did not allow for any lull time.

When an assignment calls for both an interview and shoot, I normally let the writer go ahead with the interview first. This buys me time to scout for a good location to shoot and set up. Plus, it helps to loosen the subject up a bit for the shoot. Next time you go to a shoot/interview, let your writer go ahead first with the interview so you have time for scouting and setting up.

For this, I decided to drown out the ambient light of the gym by using the max sync speed of my cam and lit our subject with two strobes. One for key and the other for high/backlight. ISO was set at 100 and aperture was f5.6.

The key light was softened up with a transluscent white umbrella in shoot through position set at 1/2 power and placed just outside of the frame, camera right. The other one also placed just outside the frame, camera left, and gridded to limit light spill. It was set at 3/4 power. I used two Foresto's for this by the way.

I did a few test shots with a stand-in to check for proper exposure and after that all I needed was to put the legend in the frame.

Once interview was done, we had Gerry change into a boxing outfit, put him in the ring and shot his portrait right away.

Mission accomplished! Portrait shoot with no waiting time for the legend.

Next?.....The Pacman......I hope.

Happy shooting!

Friday, April 29, 2011

Mood Lighting for Product Shots


Product photography is no easy task, much more when it's stylized product photography. But I've always enjoyed these kind of shoots because your subject will never complain no matter what you do with it.

Ok that was lame.

The truth is I like stylized product photography because it gives me the opportunity to explore and learn new and different lighting styles. The people I work with are very talented individuals, interior designers, stylists, and I've always looked at them as a good source of new knowledge and skill. Their artistry and creativity inspires me to continually push myself to learn new things and hopefully bring myself to another level. "The only way to get better is to surround yourself with people better than you", the masters of this craft say.

So for this shoot, our team wanted some mood and drama. "Texture and contrast is the key" that's what they told me.

I lit this using 5 studio lights. 2 on each side and 1 overhead on a boom. The first light I set up was the overhead light. It had a grid attached to it and pointed at the couch. I had it just high enough to get the hotspot on the couch and have light spills and fall off throughout the frame. Once I was happy with it, I over exposed for the hotspot just a bit so that this will be the highest point in my contrast. Oh by the way, my shutter was set at the highest sync speed. I wasn't letting any available light in. Next light to come was for the plant and the side table with the basket lamp on it. I didn't have a softbox big enough for the desired softness I wanted so I just bounced the light onto the white wall at camera left just outside the frame. To prevent light spill beyond the side table, I used a black cardboard as gobo. Next I lit the round stool with a small softbox then placed it real close to the stool just outside of the frame. On the other side of the frame, I had a light on a floor stand pointed towards the basket on the floor. I had a sock on my light's standard reflector and flagged it so I won't spill light towards the orange chair. Last I had a gridded light aimed towards the back wall and floor to have separation between that and the orange chair.

I set my aperture at f/11 to get good depth of field for this shot. I can't remember the exact power settings of my lights, I chimped for this shot and everything was seasoned to taste.

Hope this helps, happy shooting!

Sunday, April 24, 2011

Cross Lighting for Texture


Please allow me to start with a disclaimer before I go any further. I am in no way endorsing any of the brands and products seen in this photo. The image shown is a product of an assignment given to the photographer. It was agreed upon by the photographer and his client that images produced from the shoot cannot be used in any commercial way except for the photographer's portfolio and other means of self promotion. Such image is simply being used as an example for demonstration purposes.

Whew!

So I was assigned to shoot these beauty products in group, and our very stylish stylist cleverly used rose petals as background where our products would lie on to have that pampered sort of thing (get it?.....bed of roses?).

To enhance the feel of the set up, I decided I wanted to capture the texture of the petals, have subtle yet obvious contrast and direct pronounced light unto the products.

Obviously, this is a top shot on a table and for this, I used two Forestos for cross lighting. I placed my lights across each end of the table, placed them just outside of the frame and leveled them. The one on the right was slightly lower just so lighting wouldn't be too stiff. Both lights had standard reflectors on. Though I wanted to isolate light, I decided against using a snoot or a honeycomb since I wanted to spill some light through out the frame to let those petals pop out. Instead, I put on socks for both my lights to soften it up a bit and flagged them to control the spill. I dialled down my aperture to f/11 to enhance shadow and contrast and didn't let any available light in by setting my shutter speed to maximum sync speed.

Hope this helps, happy shooting!
 

Wednesday, April 20, 2011

Small Details Count!

It's vacation time again!  Where ever you're going to or where ever you are right now, I sure hope you didn't forget to bring your camera (duh?!).

By travelling, we create memories, and by shooting, we preserve those memories. Aside from shooting your friends or family with that landmark on the background, or shooting that breathtaking sunset, it's also a good idea to shoot the smaller details.


Keep your eyes peeled for small details that would describe the places you've been to. Look for colors, patterns, anything that would speak about the character of the place.

Hope this helps, happy shooting, stay safe!

Thursday, April 14, 2011

Quickie Portrait


There are those times that you just feel lucky and blessed because you know that you won't have a hard time with the shoot. When your shooting someone who's so accustomed to being in front of the camera and can easily provide you with the shot you want, you know that you just gotta give something in return.....like maybe not take too much of their time?

Our subject for this shoot is a businesswoman and is someone who modeled for a living. So in terms of art directing her, we had our work cut out for us. The challenge was on us to make the shoot as swift as possible since we know that this model-turned-entrepreneur is a busy person. And it wasn't a surprise that she was cooperative, patient and professional in every way, thus, we wanted to do her a favor by not keeping her for long.

For quick shoots, I would rather spend more time thinking about how to compose the frame than setting up my lights. So for this, I didn't bother to put modifiers for my light to soften it up. With just the standard reflector on the head, I placed my light towards the right of my subject (camera left), pointed it away from her, set it at half power, tilted it upwards and bounced it off the ceiling. The result was this big, soft light. I opened up my aperture to blur the background and dragged the shutter a bit to let that warm tone of light in the background.

Next time your in for a quick shoot and your brolly isn't big enough to produce soft light or don't have that luxury of time to assemble your big softbox, try bouncing your light, this can give you soft light without the aid of your modifiers.

Hope this helps, happy shooting!

Wednesday, April 13, 2011

Single, Simple

I am a huge fan of single light portraiture. I not only admire it but I have been practicing this (whenever possible) for more than a decade now.

I have been using this technique either as key, fill or to light the background. The simplicity is what draws me to it.

If you're like me who started in this industry with just a single strobe to boot, you'll probably find yourself biting fingernails during shoot briefs. Always worrying if you'll be able to light for a frame properly with just one light.

Can you? The obvious answer is a resounding YES!

Whenever I work with just one light I always assess first what my ambient light is. This helps me decide on how to use my single light, whether for key, fill, or for lighting the background.


In this photo, I used it as my key light. The ambient light in the restaurant was too weak to use as key, but perfect for that "mood" lighting shot.

To light for this, I placed my single strobe at our subject's right (camera left). I decided that side lighting would be appropriate, I wanted to create shadows to add to that moody feel of the shot. I used a 36" white umbrella in shoot through position and set my strobe at its lowest power. I dragged the shutter to let those pin lights in and that cool blue light at the back was from outside (we were shooting at dusk).

I would actually suggest that you always come to a shoot prepared for anything, equipment wise that is, but if there's a limit to what you can bring, don't panic. Assess your location well, pick a spot where you have enough ambient light to work with, a background that will go well with the feel of the shot, and use these elements to create that shot.

Hope this helps, happy shooting!.

Wednesday, March 30, 2011

Mixing It Up Some More!

Some years back, I used to work closely with this client who's obsessed with natural lighting. She would encourage (require) me not to bring any lights on assignments except for the camera and a reflector. And, to achieve that natural lighting look, our shoot skeds would only be during the golden hours.

Those days were fun, and frankly, I've learned quite a lot of natural lighting techniques....but at the same time, it was nerve wracking. You never know if the situation (lighting condition) will work. And as a freelancer, I am only as good as my last shoot. My next assignment would depend on how my last shoot turns out.

So to put my mind at peace, I've always managed to sneak in at least a single light in my gear bag....just in case.


For this assignment, I needed to shoot a portrait of the owner of a coffee shop. Bearing in mind that the look of the shot has to be naturally lit, I placed our coffee lover beside a window. This will be my key light. The first challenge I faced was that the light coming in was too harsh...quick fix? I simply pulled down the blinds to diffuse that harsh sunlight and the white table worked in my favor too since it provided fill.

As far as lighting our subject was concerned, I was good to go! But you already know that that is just half the story.

Because of the strong light coming in through the window (even with the blinds down), my exposure setting for our subject caused too much contrast that the background was 2 or 2 1/2 stops underexposed.

The obvious solution that I went with was to light it with strobe, still bearing in mind though that I had to somehow make it appear naturally lit.

To achieve this, I lit the background bare bulb, and pointed my strobe towards the ceiling. I placed the light behind our subject, camera right just outside the frame and set the power of my strobe to match the intensity of my (natural) key light. Because I was spreading light by bouncing if off the walls and ceiling, I was able to soften up the light. Also, it caught the color of the wall which gave a warm colot temp as a result. I repositioned the light some more so it will evenly light the background and let some light spill onto my subject's left shoulder and face.

Though my client figured that I mixed natural and artificial light for this, she gave this a nod and made its way to print.

Hope this helps. Happy shooting!

Friday, March 18, 2011

29 Hours in Davao

Finally I was able to get myself to do that long over due hard drive inventory the other day. It's a good habit I'm forcing myself into (with great difficulty!) just so I can properly archive my files.

I chanced upon these photos which I took over a year ago when I was sent to Davao, Mindanao. I was in that city for less than a day and a half to take a portrait of a business man which my client was doing a story on.


After the day's assignment, I decided to heed our hotel front desk officer's advice to check out their city park. I sensed the pride they have for this park so I went for a night stroll there.

And they were right! It's such a beautiful park! Lots of trees, clean, fresh air, no street urchins, clean, proper security measures at the gate, good balance of pavement and ground, clean, lots of benches...did I mention that it's clean?

For these photos, I just used the usual night photography technique. Set my ISO at 400, rested my cam on a bench to steady it, dragged the shutter to let low light in and chose f8 to get good depth of field.

Next time your in Davao, visit the city park and see why the Davaoenos take so much pride in this park. Oh and....don't forget your camera.

Happy shooting!

Wednesday, March 9, 2011

Old School Revisited

Back in the days when photographers didn't have the aid (luxury) of LCD's, we were (for lack of better term) forced to study our frame and plan for our exposure carefully before tripping the shutter. Those rolls of transparencies didn't come cheap.

So as homage to the fore bearers of this craft which I have grown to love so much, Please allow me to share with you a basic and simple technique which I learned from them on how to isolate light on your subject and add drama to the image, without the aid of your lcd.


In the photo above, much of the frame is covered in black and isolated lights gave only hints of the man's profile. It's actually so cliche to shoot a blind man like this, but hey, you gotta love cliches sometimes!

To expose for this, I first turned our subject so that he will be facing towards the light, then metered for the man's face with my camera pointing at him face to face (well, face to camera to be more exact). I filled my frame with just his face so that the reading I will get will be just from the light falling on his face. This gave me a reading which yielded a setting that underexposed his surrounding background.


The photo shown is with the exposure setting with him turned towards the camera. Notice that the background is underexposed since I metered for the light on his face only. I locked on to that setting then reframed my shot showing the right side of his face. As a result, I am now capturing the shadows on his face. I pulled back some more to fill my frame with more shadows and reveal the black background. The result is an image filled with dark shades and just hints of light to direct you to this blind man's profile.  Here's the final image again.


Next time when you're in a shoot and find yourself with a bit more time, try resisting the temptation to look at your lcd to check and correct your shots and give this simple technique a try. It's worth learning it.

Hope this helps, happy shooting!

Tuesday, March 8, 2011

Food Shoot On the Fly

One of the challenges of shooting in several locations all in one day is keeping yourself mobile. By doing so, it is inevitable that you leave some (or most) of your equipment at home and just bring the bare necessities.

Over the years, I've learned that my bare necessities are my camera and tripod. If situation calls for letting me choose between my tripod or my lights, I'd pick my tripod easily. It's more practical.

In one such occasion, I only had my camera and tripod since the assignment would require me to go to several places to shoot. With this assignment I had to shoot the interiors of a restaurant and of course, the house specialty cake.

Normally (under favorable conditions), I would shoot food with a minimum of two lights, one light as key and the other as fill. But for this shoot, I didn't have time nor the space to set up lights (well, I didn't actually bring any). Quick fix? Use my tripod and available light!


To set up for this shot, I chose a window where the light coming in was diffused. I didn't want direct sunlight since this would wash everything out. This window was perfect and it would serve as my main light. I placed the cake in such a way that the light hitting it will be coming from the 1 to 3 o'clock position of my frame. This is a good way to light for a food shot since backlighting brings about more texture to your subject and it gives you your rim light. And since the window is big enough, it covered most part of the frame. To set my exposure, I metered for the jam on the cake (in shooting cakes like this, it's a good idea to meter for the darkest part). But since there was too much contrast in tones, metering for the darkest part over exposed everything else. To correct this, I underexposed the jam for 1 stop and this gave an acceptable exposure for the rest of the frame. To compensate for the underexposure, I threw in some fill light using a white plate which I borrowed from the waiter. This fill brought back the normal tone and color of the jam and it also provided fill for the shadows of the cake.

There you go, a very simple and practical way for a food shoot on the fly.

Hope this helps, happy shooting!

Sunday, March 6, 2011

Mixing Light for Portraits

In my last post, I talked about how to mix ambient with strobe light when shooting interiors. This simple technique is used by a lot of photographers in lighting for a lot of subjects...and yes, this could also be used when shooting portraits.

When I was still learning how to use strobes for my portrait shoots, I used to have the notion that I should always use them to light the subject. Well, actually, in most cases, this is true. But how about if I only have one strobe light (I only had one when I started..I guess most of us do) and needed to light the background as well? Solution? Either use the strobe light for lighting the subject and let the ambient light for the background or vise versa.

In this photo, I chose to light my subject with natural (ambient) light and used my strobe to light for the background.


Our team wanted a shot of our subject by the entrance of her house. The challenge is, the frame covering our shot wasn't evenly lit, and I came to the shoot with only one strobe(out of laziness basically). Luckily, I had enough ambient light to work with.

The solution(and set up) was actually very simple. Here's how I did it.

Since I only had one strobe to work with, I placed our subject in a spot where I can fully utilize the ambient light. In this case, we placed her at the left side of the door. This is a sweet spot for the ambient light and she would not be covering that path leading to her living room. The light falling in this area is about half a stop over the light falling onto the living room behind the brick wall. That was fine since I wanted a bit of separation for my subject and the background. I metered for this and set my exposure for this lighting. By doing so, I got the exposure I wanted for my subject and the living room. But the small hallway between her and that brickwall was 3 stops underexposed because there was very little ambient light falling unto it. So I put my sole strobe behind her at camera left (just outside the frame), set the power to match the ambient light and bounced it off to the ceiling.

And that's it! One very simple set up using just one strobe.

Hope this helps. Happy shooting!
 

Wednesday, March 2, 2011

Shooting Interiors

Shooting interiors can be a lot of fun, at the same time, it can be a bit of a challenge. One of the most common obstacles that a photographer encounters when shooting interiors is how to handle the lighting. In most cases, an interior would already have an ambient lighting which matches the theme of the room, and, more often than not, this ambient lighting would suffice to make a good image.

From here, a photographer can decide then whether to shoot the interior with its ambient lighting only or to mix it with flash or strobe light. Me however, I choose the latter (most of the time), and for a good reason. By mixing ambient and strobe light, I can fill in areas of shadows and/or add highlights unto the image. Here's how I do it.

First, I strongly suggest that you use a tripod when shooting interiors. This will greatly help you steady the camera since you would be using long exposures if you are going to capture that ambient light.

When mixing ambient and strobe lighting, remember that your shutter speed controls the ambient light and the aperture controls your strobe/flash lighting.

In this photo, I added strobe lighting coming from the right and hitting the right side of the wall and the table top. Being careful not to drown out the ambient light of the room and the lamp.


To do this, I first set my f-stop at 5.6 since I wanted to blur the foreground just a bit. I metered for the ambient light to get the right combination of aperture and shutter speed for the correct exposure. Once I got that, I placed my strobe at camera right in line with the table and bounced it off to a wall on the right. By bouncing my light off to a wall, I was able to soften up the light falling onto the table. I then adjusted my ambient light settings to yield for a half-a-stop underexposure (to allow for that highlight from my strobe). Set the power of my strobe half-a-stop over the original ambient light reading to create that slight highlight on the wall and table top.

In another example of mixing ambient and strobe lighting, for this photo I metered for the ambient light first and simply filled in the shadow areas by bouncing my strobe onto a wall behind the camera.


Hope this helps. Happy shooting!
 

Thursday, February 24, 2011

Canon 50mm 1.8II Lens - The Best Lens for Me

Let me start off with a disclaimer, I am not in any way endorsing Canon or any of its products. This is just my personal opinion based on my personal experience with their product, particularly the humble 50mm 1.8II lens.

The Canon 50mm 1.8II is not made up of any expensive material, doesn't have the bells and whistles that all the other lens have. As a matter of fact, once you hold it, you kinda get the feeling that it is not made for the working pro. It is made of plastic and feels flimsy.

But this lens is on my camera body 90% of the time. From products, portraits, photo journalism, and on some occassion, even interiors, I have used this lens and produced outstanding images with it. It focuses fairly fast (it doesn't have USM so let's be forgiving), it's tack sharp (as far as my clients and me are concerned), and my favorite part about it is it's very light ( I handhold a lot!).

More than the technical aspects, what I love about this lens is what it does (and gives) to me as a photographer. I started my career as a photographer during the film days and have worked almost exclusively wiith the medium format. Back then, there is very little choice of lens and I have been forced to work with just the standard 90mm lens for my Mamiya RB67. Because of this, the discipline to carefully compose, plan and think about a frame before tripping the shutter has been deeply inculcated in me. To work with what is available, to crop out the unneccessary and to maximize the entire frame by choosing the composition well are the things that working with a prime lens has taught me. And in this digital age, I have likened the Canon 50mm 1.8II to my former favorite 90mm for my RB.

With the coming of sophisticated lenses, it is easy to get distracted and sometimes, even get lazy, because technology can assist you in every way possible. Technology is a wonderful thing but one should never forget that an image is created by a person and not by an equipment. A photographer (ideally) should be able to decide on how to frame a picture even before he looks through the viewfinder and should be able to create a good image regardless of how crude or sophisticated the equipment may be.

The 50mm that I have been using for more than 4 years has helped me maintain that (film) discipline and has helped me further hone my composition skill. This is the reason why I think that the Canon 50mm 1.8 II is the best lens.